More Woodturning Magazine
https://www.morewoodturningmagazine.com
This Product Reviews page was printed exclusively for More Woodturning Magazine subscriber:
Kurt Hertzog at: kurt@kurthertzog.com
Product Reviews
December 2018
 Click ad to visit our sponsor
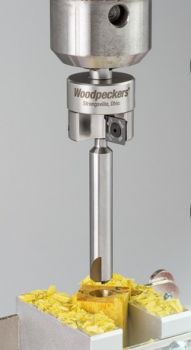
Without trying to open the proverbial wound about which is a better process, using a pen mill or sanding (whether belt, disk, or lathe faceplate), I'd like to review a new entry into the pen mill arena. The latest is a new and different design from the folks at Woodpeckers.
Woodpeckers is a newcomer to the turning community. Their products have been a mainstay in the woodworking market for many years. Their designs and manufacturing sets them apart. They usually have a unique and ingenious design to solve a problem along with high quality fabrication and packaging. They recently have expanded their horizons into the woodturning market with their Ultra-Shear line of turning tools.
This is a 9-piece family of carbide cutter tools. Woodpeckers latest product entry into the woodturning market is a pen mill for the penturning community.
The 13-Piece Pen Mill Set
The pen mill set that I evaluated is the complete 13-piece set of the Woodpeckers' Ultra-Shear Pen Mill - Ci. The set is packed in a black blow-molded hard shell case.

Photo 1 - The Woodpeckers Ultra-Shear Pen Mill Ci 13-piece set comes in a conveniently stored blow-molded plastic case.
Inside the case were the instruction sheet, a couple of sheets of anti-rust Protek Wrap, the cutter head, the two Allen wrenches needed, and the entire set of 12 pilot/reamers all nestled into their respective foam cutout pockets. The foam padding keeps everything orderly and protected. This not only protects the cutter faces on the cutter head but also the sharp surfaces on the pilot/reamers. Since only one pilot is used at a time, it is very convenient to replace the current pilot into the correct storage pocket prior to taking out another. None of the pockets are marked with a size but this arrangement of replacing the recently used pilot and then taking a different one keeps everything in workable order.
 Photo 2 - Inside are the instructions, rust prohibitors, and the complete set of 12 pilot/reamers, the cutter head w/ cutters, and the two Allen wrenches needed. |
 Photo 3 - The entire packaging was well thought out and executed. Every piece is nested nicely and well protected. |
The Design and Operation
There are four major differences between this pen mill and the others currently available on the market. The first difference is the cutting mechanics. The Woodpeckers design uses two square carbide cutters mounted 180 degrees apart.
 Photo 4 - Similar to other mills with an interchangeable pilot/reamer, the Woodpeckers mill uses two opposite mounted square carbide cutters. |
 Photo 5 - The beauty of this design is that the cutters are replaceable. Not only are the head and pilots part of your permanent kit but you don't have the issues of trying to sharpen the cutting faces. |
Rather than the permanent two-edged or four-edged cutters on other pen mills, these carbide cutters are replaceable, keeping the cutter head as a permanent part of the tool. Being square, there are four sharp faces on each carbide cutter that can be rotated into service as needed prior to replacement.
 Photo 6 - Note that the interchangeable pilot/reamer shafts aren't used for the mill chucking and clamping. |
 Photo 7 - The cutters are nested well for orientation. The easily rotated or changed cutters let you keep the mill sharp and working well. |
Another difference between this pen mill and the others on the market is the reamer design. Most of the mills have a "scoop" sort of a reamer that slices in from one side to carve the excess adhesive from the side walls of the brass tube. The Woodpeckers reamer design is similar to a drill bit.
 Photo 8 - The reamer design of the Woodpeckers mill is more like a drill. It is centered and has two sharpened cutting surfaces. |
 Photo 9 - With a centering reamer, the drill press can be rotating while the reamer is engaged--not practically done with the traditional scoop design on the right. |
As such, it centers while being used and cuts away at the excess adhesive from the center outward. The similarities with other brand pen mills available are the pilot interchangeability and similar fastening methods. To replace the pilot with that of a different size requires loosening the set screw and removing the current pilot. The desired pilot is slipped into place, bottomed out properly against the cutter head, the shaft rotated until the shaft flat is located under the set screw, and then the set screw fastened tightly. A big difference between the Woodpeckers pen mill and the others is the diameter. Most mills available are purchased based on the diameter of the facing performed. You can purchase a 5/8" or 3/4" cutter head of a 2 or 4 face design. The two face cutters are usually a non-replaceable carbide and the four face designs are usually plain steel. The facing performed by the Woodpeckers pen mill is well over 1", just shy of 1 1/8".
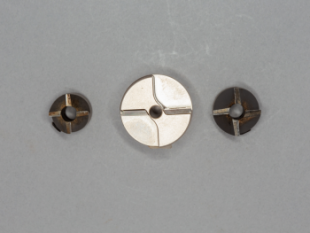 Photo 10 - A comparison between the traditional pen mills and the Woodpeckers mill. By design with the carbide cutters, it is much wider. |
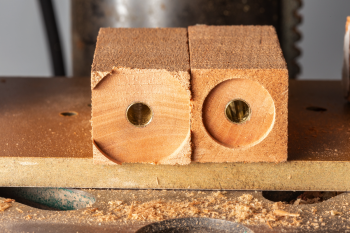 Photo 11 - While not usually needed, the Woodpeckers mill provides a much larger faced diameter compared to the standard 5/8" and 3/4" mills. |
The operation of the mill is exactly as with others. It is mounted into a drill press at a reasonable speed once set with the correct pilot/reamer and lowered into the brass tube for guidance. The reamer clears excess adhesive as lowered until the cutters engage the wood proud of the brass tube. The facing continues by lowering the mill until sufficient material has been faced off presenting the very end of the brass tube. Done properly, any excess adhesive inside the brass tube has been removed and the wood or other blank material is now flush with the brass tube and perpendicular to the axis of the glued in brass tube. The last design improvement that I appreciate is the drill press clamping arrangement. The current market mills clamp on the shaft of the pilot. Clamping a round shaft with a three jaw drill press chuck works but can be prone to slipping. Of course, you shouldn't be putting so much load on your mill that it will slip but I've had it happen. The Woodpeckers mill clamps on the cutter head body itself. The pilots have no part in the drive of the mill and run virtually unloaded while they perform their adhesive removal and guidance on the inside diameter (ID) of the brass tube. The cutter head body has three faces that match with the three jaws in the drill press chuck. This self-aligning and very sturdy mounting allows for positive drive without requiring the over-tightening of the chuck.
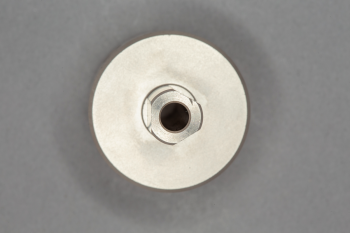 Photo 12 - Another nice touch is the three clamping faces built into the Woodpeckers mill. No reefing down on a round shaft required. |
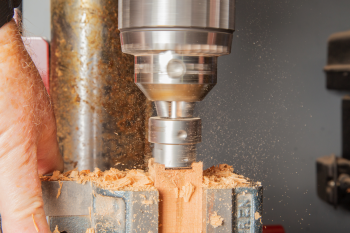 Photo 13 - The three faced mounting allows for a solid grip on the faces as well as chuck contact with the cutter body top surface. |
Pricing and Availability
The Woodpeckers Ultra-Shear Pen Mill Ci is offered as a 5-piece set or the 13-piece set.
The 5- piece set has the cutter head along with four pilot/reamers (7mm, "O", 3/8", 10mm, and 27/64"). These most common sizes will cover a large variety of the most common kit pens available and retails for $99.99.
The complete 13-piece set includes the cutter head and all 12 of the currently available pilot/reamers retailing for $169.99. The 12 pilot/reamers included are: 7mm, "O", 3/8", 25/64",10mm, 10.5mm, 27/64", 11mm, 15/32", 31/64", 12.5mm, and 33/64".
There may be other sizes needed for the rarity kits but I'm not aware of any immediately.
The cutter head is available separately for $49.99 and the individual pilot/reamers are available as needed for sizes not included for $12.99 each for those needing only one or a few sizes.
The carbide cutters are the same cutters as used in the Woodpeckers Pen Size Square tool. They are available in single packs (blister card) for $14.99 from Woodpeckers, Woodcraft, and other Woodpeckers dealers.
The announcement date for the Ultra-Shear Pen Mill Ci product was November 28th and is available through Woodpeckers, Woodcraft, and Berea Hardwoods.
For more information or to purchase, click here.
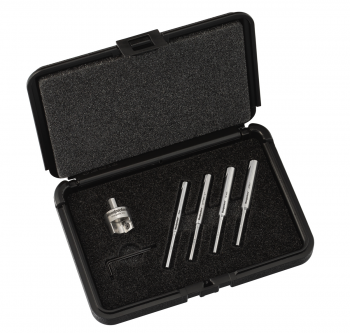
Photo 14 - The 5-piece set is packaged as nicely as the 13-piece set in a smaller blow-molded case with foam insert to cradle everything.
Impressions
The Woodpeckers Ultra-Shear Pen Mill Ci follows all of the Woodpeckers other product offerings. It solves a problem, usually in a unique manner, and is made in the US from the best quality materials. Sparing nothing in the execution and packaging, this pen mill fits into their typical product offerings.
I am extremely impressed with their design and fabrication. All aspects are top shelf and while this isn't the bargain bubble pack product, it is a quality tool that should last as many years as you'll need it and then be capable of being handed down.
From a "what problem did they solve" perspective, I believe that the replaceable cutter concept on a permanent cutter head is an attractive option for the pen turner. Is it more expensive? Sure it is, but only once. While pen mills can be sharpened, they progressively get less and less useful until they are trash. The need for a unique pilot for each brass tube diameter is the same and even though I make due on occasion by using painter's tape to fudge the diameter, the correct pilot is the proper way to go.
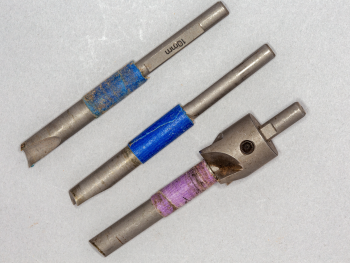
Photo 15 - My solution for making the pilot fit when the correct pilot was not available. Workable but certainly not pretty or convenient.
In the grand scheme, the rotating of the cutters and then ultimate replacement may be more or less economical based on your use, treatment of the tools, speeds and feeds, materials, and more. I think you'll find that having replaceable razor sharp cutters and planning your blanks to have minimal amount of wood to be removed will prove to be financially attractive.
Another potential problem solved, depending on your method of using a pen mill, is the design of the reamer face. As a drill type, it can be easily lowered into the brass tube while the drill press is running. It tends to center and will not wander as a traditional pen mill can with the side wall scraping cutter. That mill will wander, deface the brass, and often bend the pilot shaft if it is brought into service with the drill press running. My method for using that type of mill is to lower the pen mill to the blank with the drill press off, spin the drill press by hand until the ID cutter is engaged, and then turn on the drill press to perform the ID cleaned and end facing process. Doable but somewhat awkward.
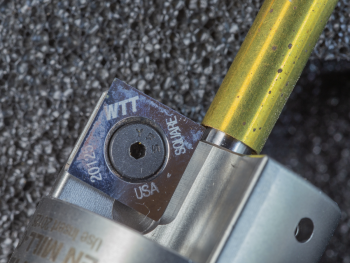
Photo 16 - By design, the cutter face overlaps the wall thickness of the tube so the finished tube cut surface is flat for the entire thickness.
Another occasional problem that the Woodpecker design has appeared to solve is the brass tube wall being thinned and defaced as it creeps between the pilot and cutter head of the tradition pen mill. While an occasional problem, it is a problem that needs a generous chamfer to resolve and has already shortened the overall tube length somewhat. The Woodpeckers design eliminates this issue by means of cutter location. Their carbide cutter positioning overhangs the brass tube wall thickness intruding into the inner diameter space. This cutter location ensures that the end of the tube will be presented to the cutters across the entire wall thickness.
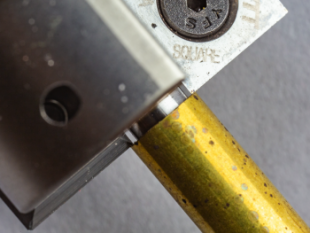 Photo 17 - An example of thoroughness in their design. This cutter positioning and tube overlap provides a flush, perpendicular face on the blank. |
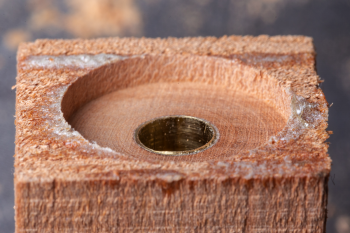 Photo 18 - An occasional problem with traditional pen mills. The brass tube can creep between the pilot and the cutter leaving a ragged un-flat tube end. |
More Impressions
I liked the very visible pilot/reamer diameter markings on the shaft of each of the pilot/reamers. While many other makers do mark their various pilot/reamer sizes on their pilot, often it is on the shaft that is positioned inside the cutter head. This makes it impossible to see when it is installed. Nice if it is the size you need, but you will either have a good eye or have to test fit it. They usually put the markings on the flat of the shaft making the marking easier on a flat surface rather than requiring a rotary marking. I also liked the trilobular drill press mounting of the cutter head. No round shaft to reef down on in the drill press chuck to prevent slipping. The three faces on the cutter head are easily located in contact with the three faces of the drill chuck and snugged up sufficiently to do the job. While most other manufacturers offer an assortment of pilot/reamers, often the solution to certain sizes is a shim that fits into the brass tube so a different sized pilot will work. While this does work, it is a bit of a cobble job and it doesn't allow for the proper use of the reamer to clean the ID of excess adhesive. The Woodpeckers use of a pilot/reamer dedicated to each individual sized brass tube will allow for tube cleaning and proper piloting on any sized brass tube.
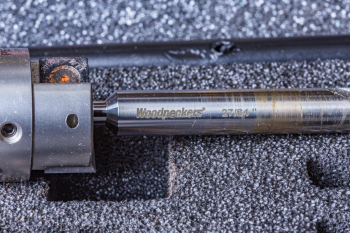
Photo 19 - I really appreciate the prominent pilot/reamer size markings on the shaft where they are always readily viewable.
And More Impressions
The only thing that I found that I wasn't a fan of was the length of the pilot/reamers. I haven't yet found out why they are as long as they are but they specifically made them longer than the typical brass tube used in pens. Not a deal breaker but it does present some process issues.
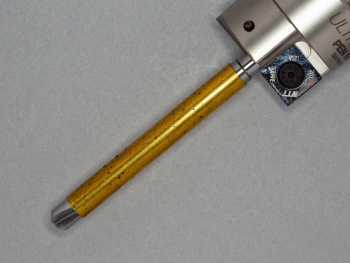 Photo 20 - The Woodpeckers pilot/reamers are longer than the common tube lengths. I'm unsure why since you face both ends. |
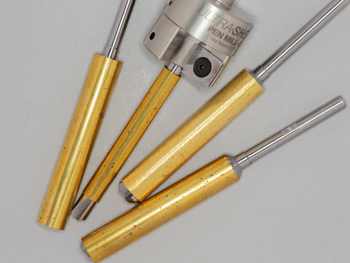 Photo 21 - Virtually all of the sizes are longer than the tube once it is up to the cutting area. This requires an open hole below the blank to allow the excess pilot length a place to go. |
If you use a drilling vise to hold your work as you face the end, you need to space the blank far enough off the table of the drill press to allow clearance for the extra pilot length as the cutter faces get low enough to be in operation. Of course you could position things over the hole in the table, but I don't use a vise for facing and often my blanks are smaller in size than the hole in my drill press table. My method is to hold the blank with a quick clamp and position it over a scrap piece of wood that backs the blank, keeping it in place for facing. This accomplished two things. First, it lets the blank move and cant any way necessary to keep the tube oriented properly for the pilot. It also is much faster as I can face one side and then flip it over without changing the quick clamp grip and face the other side. Requiring me to position the blank over a hole or grip it spaced off the surface to accommodate a long length pilot doesn't add value for me. I'll get both sides faced and the tube excess adhesive removed with a shorter pilot that is long enough to guide yet short enough to not bottom out on a standard length tube.
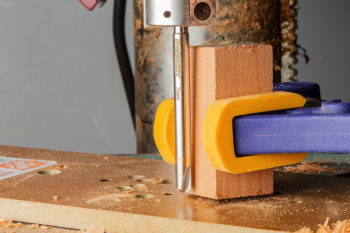 Photo 22 - My technique of holding the blank with a quick clamp allowing for any orientation needed runs into a bit of problem with any pilot longer than the blank. |
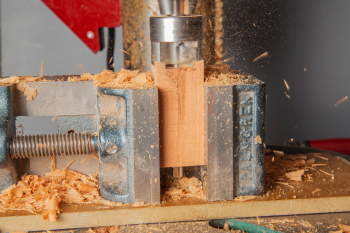 Photo 23 - While I don't recommend using a pen or machinist's vise for facing because you can't insure tube orientation to the clamped surfaces, you still need some space underneath. |
My other issue with the pen mill in use was the operation of their reamer. While it allows for a positioning operation with the drill press running, I don't need that and wasn't a fan of how well the reamer worked on polyurethane adhesives. It seemed to work fine with adhesives that were only cladding the ID walls, but not when the whole ID was plugged. There was no way to "drill" through this situation since the design has no way to expel debris upwards. All debris needs to exit downwards. As a user of mostly polyurethane adhesives other than laser cut kits, the reamer operation didn't work as well as the side scoop removal tools. They can exit debris upwards as you engage them.
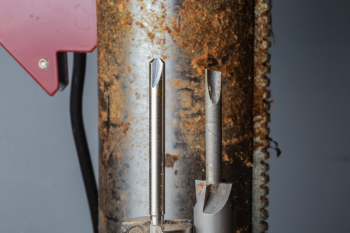 Photo 24 - I found that the pilot/reamer did a great job at removing excess adhesive providing there was only wall excess, not a complete plugging. |
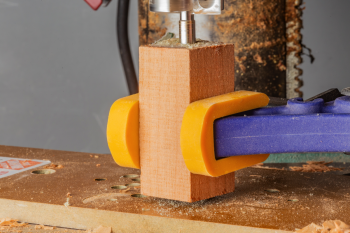 Photo 25 - The Woodpeckers pilot/reamer has the advantage of being able to be engaged while the drill press is running. A time and switch life saver. |
Final Impressions
I have used pen mills for nearly 20 years and am a big fan of them. As a matter of fact, I use a pen mill on every pen I make except laser cut kits. For those alone, I use an ID guided mandrel fixture to sand them perpendicular on a properly aligned belt sander.
I have never found a pen mill of any size, style, or sharpness that would properly face a laser cut kit without the high likelihood of destruction. I tried the Woodpeckers Ultra-Shear Pen Mill Ci on a laser cut kit blank and it worked perfectly. I was able to pilot properly while it cleaned the excess epoxy from the ID of the tube. I only use epoxy on my laser cut kits. My experience was limited to the few laser cut kits I had on hand. The fact that I was successful on the few I tested is very encouraging. Perhaps it was the style of the kit, the newness of the cutters, light touch, all of the above, or plain dumb luck. I will continue to experiment with the laser cut kits in hopes that this pen mill will work on them. Even if I need to return to sanding the laser cut kits, I'm very impressed with the Woodpeckers Ultra-Shear Pen Mill Ci. It is very well built, solves some of the issues that I have experienced with the traditional pen mills, and will be a one-time purchase tool. Gone will be the box of mills that need to be pawed through to find a sharp one. Gone will be the unavailable or missing pilot size that needs to be fudged by winding painter's tape around the closest sized pilot in the shop.
The Woodpeckers pen mill is certainly pricier than the current competition in the marketplace, but when I look into the current box of pen mills (only a fraction of what I've purchased, worn out, and discarded over the years) I see why I would have liked to have this option available to start.
I recommend this new Woodpeckers tool without reservation. The few nit-picking items I've mentioned are far overshadowed by its performance overall. If you are a pen mill pen turner, I think you'll be very pleased with this product. If you are one of the pen mill haters, I suggest you give this a try. I believe it will wean you of the sanding process and bring you back into the fold. I suggest you add the Woodpeckers Ultra-Shear Pen Mill Ci add to your kit. I think you'll be very pleased.
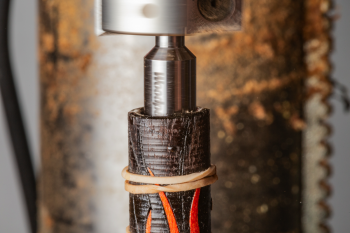 Photo 26 - Never having been successful using a pen mill on a laser cut kit blank, I gave the Woodpeckers a try. The reamer cleaned inner wall excess epoxy well. |
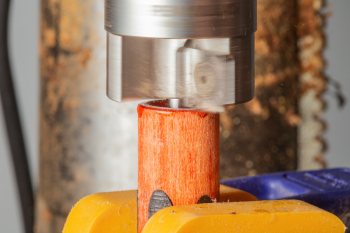 Photo 27 - Being successful, doing the other end was a breeze since it was solid. |
|
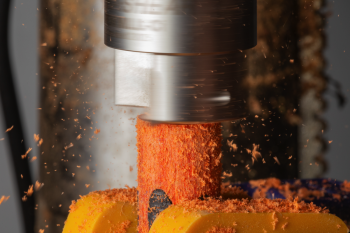 Photo 28 - With the extremely sharp cutters, relatively high speed, and light touch, the trimming went well. |
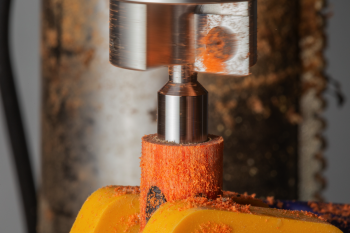 Photo 29 - The higher speed was only practical because the amount of wood being removed is much less than a standard solid blank. |
|
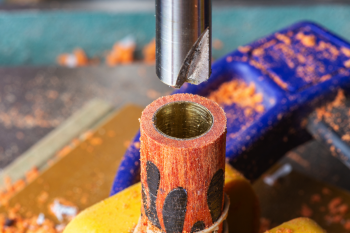 Photo 30 - I was pleased with the reamer success and the facing results. Perhaps there is a barrel trimmer for laser cut kits. |
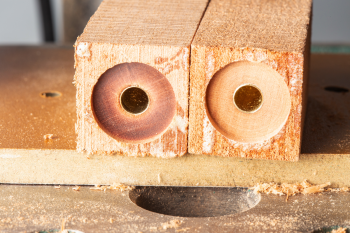 Photo 31 - Two results that you should never have again with the Woodpeckers mill: with sharp cutters, no more burning; and with the cutter overhang positioning, no more ragged tube ends. |
|
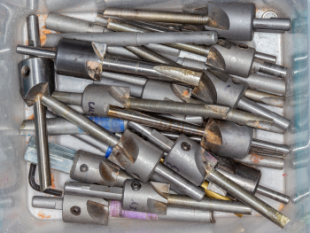 Photo 32 - With the Woodpeckers Ultra-Shear Pen Mill - Ci, you can say goodbye to your box of good-to-shot pen mills :-) |
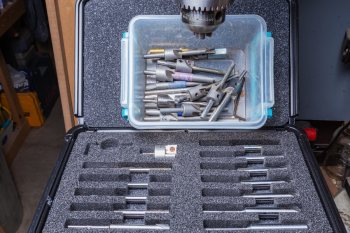 Photo 33 - I've made my choice. I'd rather have a lifetime tool that I occasionally change cutters than an ongoing collection of new and not-so-new trimmers that are often unusable or don't have the correct pilots. |
Submit Questions / Feedback on this Product Review
